Registration Guide for Prospective Members
Welcome to TeamSnap! As a prospective member of a TeamSnap sports organization team, we've put together this helpful guide to assist you in getting registered and comfortable with the TeamSnap app!
In this article
Sign In or Create Your Account
To get started with registration, you should have received or have access to a link to the registration form for the organization you intend to register with. This may be shared with you via email or on the organization's public website. When you click the link to begin the registration process, you will be asked to either sign in if you are already a TeamSnap user, or to create your account if you are new to TeamSnap.

Registration Checklist
✔ Add Participants
Once you are signed in you will be taken to the first page of registration - the participant information form. This is where you will add the information for the participants being registered, as well as any parent/guardian information requested. Fields marked with a red asterisk * are required information. If you run into any issues with fields being required for your particular registration that you either cannot provide, do not apply to you, or otherwise are unable to complete, please contact the specific organization that you are registering for.
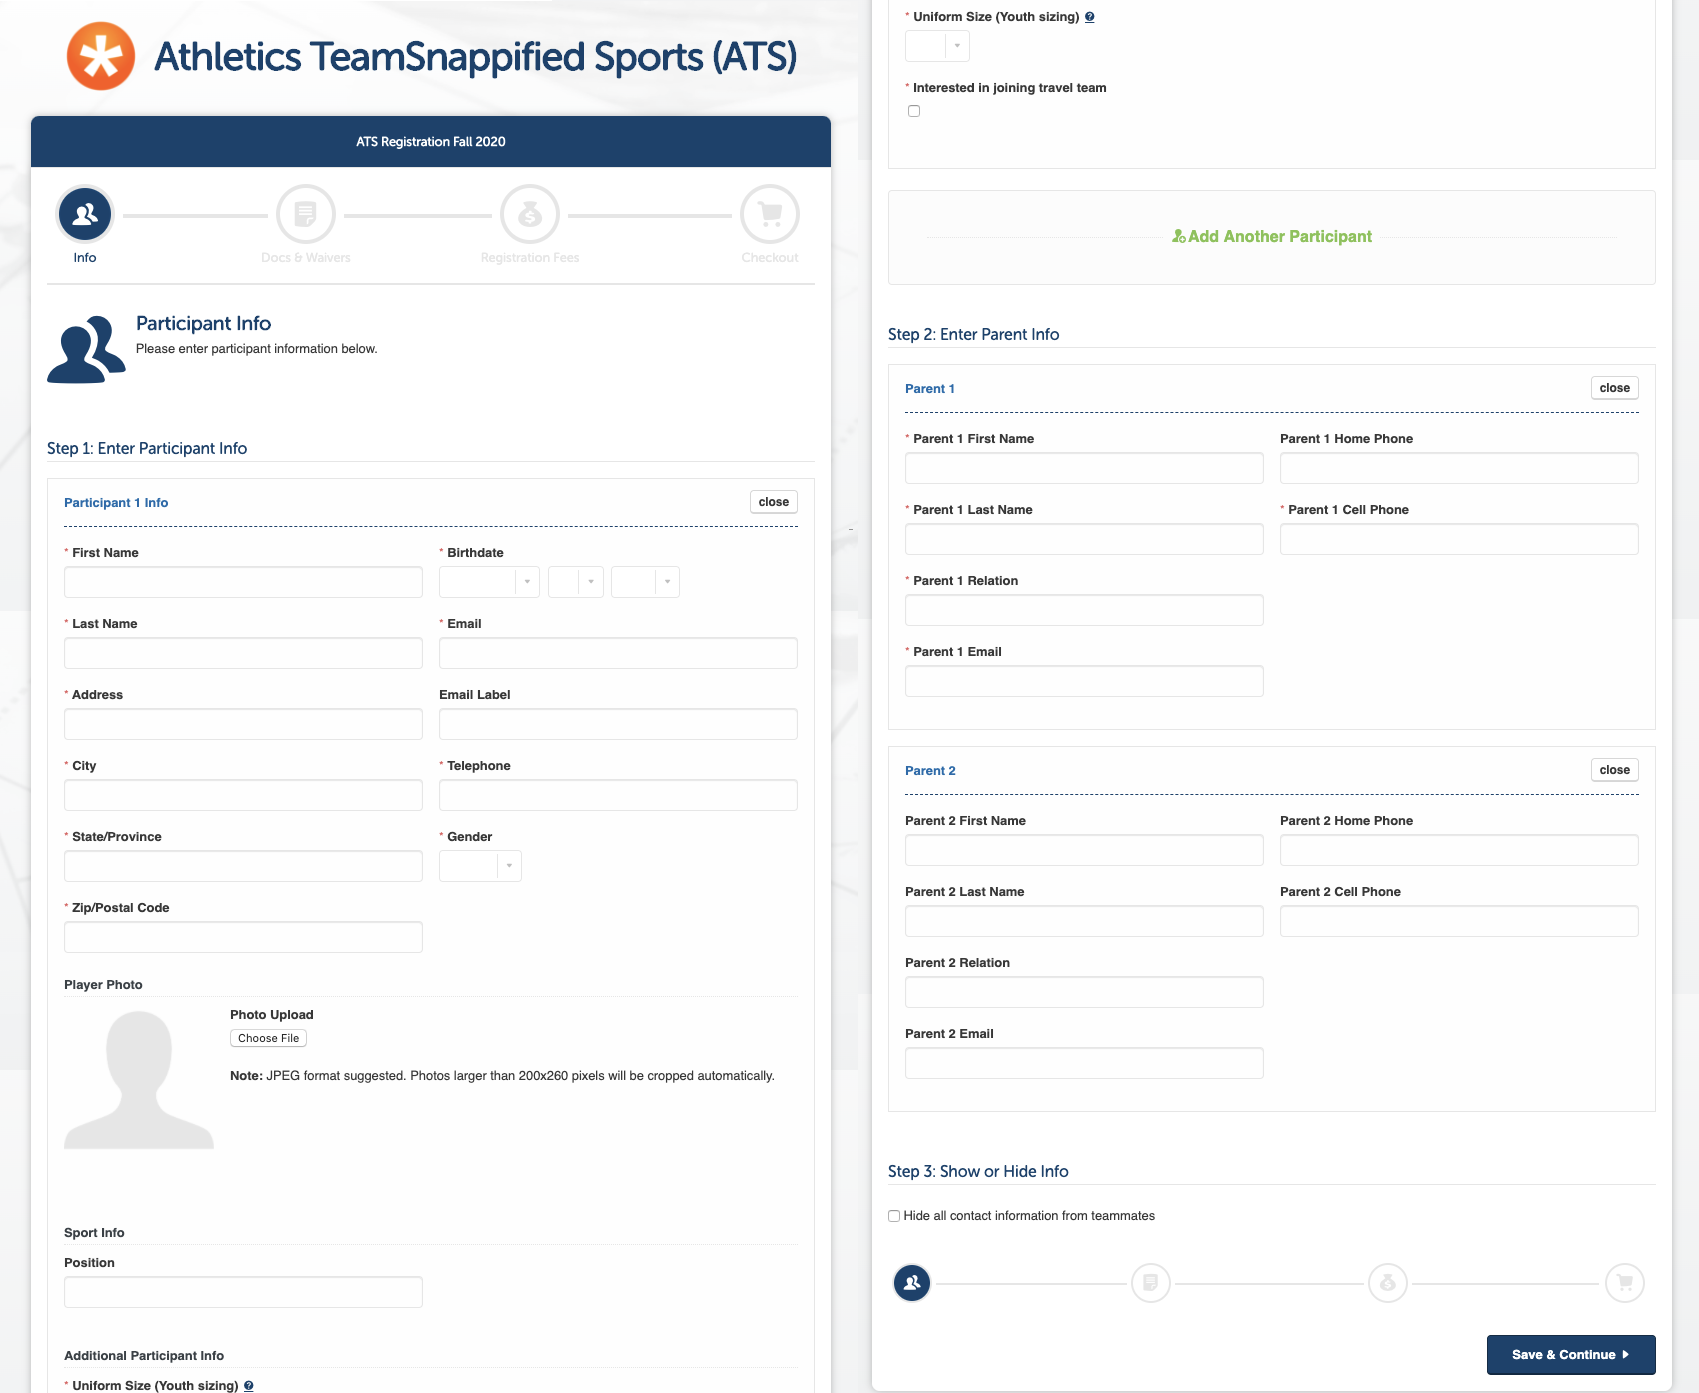
If you are registering multiple people, click the Add Another Participant button to generate an additional participant info section. You can add as many participants as needed.
✔ Complete the Documents and Waivers Acknowledgement
If you see a red asterisk anywhere in the form, it means the information is required in order for you to proceed with the registration process. You may or may not be required to review or submit documents but you will always be required to acknowledge any waiver information that the organization has provided to you in the waivers section. Depending upon how the organization has the form set up, you may be asked to acknowledge by checking a box, entering the registrant's initials, or entering the full name. There will be a hint above the acknowledgement field to let you know how to acknowledge the waiver. If you have any issue or objection to the document or waiver requirements your organization is requesting, you will need to contact the organization to discuss that with them.

✔ Select Your Fees
When you get to the fees portion of your form you will see the available participant and/or form fees that the organization has made available to you. In some cases they have set up filters on various fees in order to serve up only those that are applicable to the participant being registered. For example, if the organization has divisions organized by age groups, they may set up a filter on their fees so that only the fees for the age group your participant is eligible for will be shown to you.
If for some reason you do not have any fees presented to you and are unable to proceed with your registration, double check the participant information that you entered to make sure everything is correct. Once you have confirmed that, you will want to reach out to the organization so they can look into any possible fee issues and see what's going on.
✔ Checkout
When you reach the checkout screen you'll be presented with a list of each fee included in your total and your options for payment. Online payment options may include paying using any major credit card or paying via ACH (Automated Clearing House aka electronic check). Some organizations may also provide an option for paying in installments. Currently, the only way to take advantage of installments is to pay via credit card. 
Installment payment schedules will be presented below the credit card information area so that you can see the payment breakdown and the total that will be processed immediately upon checkout.
If your organization has opted to accept offline payments and you choose to pay that way, you will need to make sure that you submit payment via cash or check directly to the organization following whatever instructions they provide for you.
Once you have selected your payment method and/or entered your payment info, you'll be taken to your receipt or payment voucher screen. For those paying offline, you'll want to print the voucher to include with your payment to the organization.
What's Next
Once you are finished up with everything form-wise, you can click the Go to Dashboard button on the final screen and you will be taken to the log in screen for TeamSnap. Keep in mind that until you complete checkout on your registration form AND your registered participants are assigned to a team by the organization, you will not see any teams listed in your account. We recommend checking out our Welcome Guide for Members and Contacts to get you familiar with the TeamSnap Dashboard and getting started with TeamSnap.
Complete Unfinished Registrations
If you begin a registration form and are unable to complete it for any reason, you can jump into TeamSnap to complete it at any time. Once you create your TeamSnap account credentials before ever starting your form, you will have the ability to sign into TeamSnap to access your pending registration. If for some reason you need to cancel the form entry that you began, you also have the option to delete your registration when it's in pending/incomplete status.
➜ Complete or Delete an Unfinished Registration
View Your Completed Registrations
You can view your completed registrations under the My Registrations section of the TeamSnap Dashboard for up to one year after completion. Registrations cannot be removed from the dashboard prior to one year, and they cannot be brought back to the dashboard after the one year expiration. For this reason, it is advised to print receipts prior to the registration dropping off of the dashboard.
Pay Remaining Registration Installments or Offline Payments in Full
In some cases you will have the option to pay your registration fees in installments or to pay your fees offline via cash or check directly to the organization you are registering with, if the organization has made those options available to you during the registration process. If you made a selection for either of those options and later wish to pay your full installment or offline balance in full online, you can do so at any time.
➜ Paying Registration Balance in Full
Print Registration Receipts
Receipts for registrations are available from your TeamSnap Dashboard for up to one calendar year from the date of registration.
➜ Print a Registration Receipt
Support Contact Options
Is something not working right in your TeamSnap account? Stuck somewhere and not sure what to do next? We have a dedicated team for that!
Our customer experience team is here to help. You can reach them via the Help button in the bottom right corner of the screen.